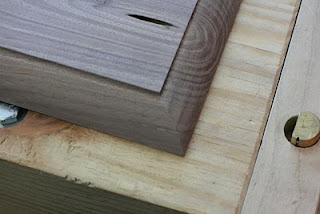
It begins with a 1/8" rabbet cut along the front and side edges of the lid. Traditionally cut with a rabbet plane, a router will perform the task quite aptly.
With the rabbet cut, I used a round object to mark the remaining radius of the molding on all corners. At this point I grabbed a low angle block plane and started planing the edge of the profile by hand. I like the irregularity of the result and the less than perfect symmetry of the radius. I work by establishing a chamfer and refine the edge with successive passes,.
Here are the results:
With the lid finished, I cut the cleats and added a chamfer on the ends of each one:
With the cleats chamfered, a few swipes with the smoothing plane, and we are ready to mount them to the lid:

If there is ever a time that I slow down and get all my ducks lined up in a row before continuing it is attaching hinges. Perhaps I still haven't done enough hinges but I still get in trouble now and then. In order to match the style of the chest and keep costs reasonable I chose a un-equal strap hinge from leevalley labeled "A" on this page :(http://www.leevalley.com/US/hardware/page.aspx?p=41912&cat=3,41241,41262&ap=1). This is a great looking hinge that has a worn patina.
There is a hitch however, you have to bend it yourself, of course that is probably its strength as well.
Its not all that difficult but there are a few gotchas:
-Be aware that you must account for the thickness of the leaf when marking where you want the bend to start. In this case the leaf was 1/16" thick so I started the bend 1/8" ahead of where it was to end.
- Use a hammer and metal vise,
- The closer to 90 deg. the bend, the better the fit. You want a nice square, crisp bend.
-Try and use double stick tape to "test drive" the hinge action, making sure it does not bind and there is enough clearance. You can always make the hinge mortises deeper, but you will have to shim to make them shallower.
Bend the hinges by clamping in the vise, using your hands to start and finish with a hammer.
Mark your mortise locations using a marking knife. In this case the depth of the mortise was for the thickness of the leaf and the barrel. In reality this turned out to be too deep and I feel the barrel should stick up past back's edge by a tad. The mortises sides are establishing using a Razor Saw and a sharp chisel is used to pare down to the bottom. Take your time, there are no second chances without shimming.


According to the Chris Schwarz there is an old furniture maker's dimension to determine the distance between the hinges. You take the length of the lid and divide it by 2 and that is the distance the hinge's centerline must be apart. I spaced this hinge, 2 hinge widths from the side and since the lid was 40" wide, the other hinge 20" over. This worked perfectly for me, especially given that with this type of chest, because of the till's lid, it cannot be mounted symmetrically.


Nab, I actually did not know the rule for spacing the hinges apart, that's a great tip. The box is looking great, as is the blog - the photos are very well done.
ReplyDeleteThe hand planed round over is a very nice touch!
ReplyDelete