Big dovetails are as much fun to cut as they are to piston-fit together.
It all starts with your layout:
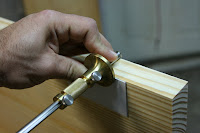
I like the pins and tails to stick out a bit when assembled so I can plane everything flush post glue up, so I pad the marking gauge with a business card. I strike a deep groove to mark my baseline.
Once all the baselines are marked, I cut a 1/32" rabbet on the inside faces of my tail boards. If you are unfamiliar with this technique, read up on it here via the obligatory Schwarz post:
http://www.popularwoodworking.com/techniques/joinery/handplanes-and-dovetails
I like a router table setup for the cut, for lack of a moving fillister plane.
Set the fence for flush with the leading edge of a sharp straight bit, and then bump it a hair back.
Set your tail board on its top edge and adjust the bit so it grazes the top of your baseline mark, run you tail boards across an you should get this:
Now before you start reaching for the chisels, lets do some quick layout.
Gang your boards together and even their edges flush. I clamp this assembly together and use a hold-down in the right bench leg to tighten it against the front edge of the bench top. You want this to be rock solid.

Dovetail proportions are as varied and personal as any other stylistic choice in the craft. Pick your own poison and stick with it. My vote is well summed up by Roy Underhill :
http://www.popularwoodworking.com/techniques/joinery/roy-underhills-dovetails
No need to repeat that info here.
I generally measure out the center of the tailboard, mark 1x stock thickness on either side, and that is my center tail. From their I will mark out 1/2 x stock thickness and those are my pins, continuing in this manner until all my joint is laid out.
Next up, sharpen your implements.


Nabs I Don't understand your last paragraph sorry
ReplyDeleteKip I added another picture with a bit more clarification, hope it helps.
ReplyDeleteNow I see what you meant. Nice graphics that made it very clear. Sorry to make you redo that blog entry. I thank you sir for clearing that up for me.
ReplyDelete